What is it?
DirectCamera Android enables high performance camera capture and playback within Unreal Engine on Android devices, including phones and VR Headsets such as Meta Quest 2 & 3. It uses the Vulkan graphics API to keep all video handling in GPU, with frames being decompressed directly into Unreal textures, which means you can use full camera quality in-game. It also enables you to select and capture multiple camera devices e.g. front and back cameras, left and right eye cameras on Quest 3, and to easily configure camera settings such as shutter speed, resolution, white balance & focus through blueprint.
Buy it here:
https://www.fab.com/listings/b1ad42b6-f1f5-479c-a2b2-af24cd4bc18b.
Demo and test APKs
Sample project and test APKs (you need the plugin to build from source obviously): https://github.com/joemarshall/directcameraexamples
For larger developers wanting full source code access etc. contact me direct at unreal@joemarshall.org.uk
How to use
For full documentation see the doxygen docs. The below is the TLDR version…
Open a Camera
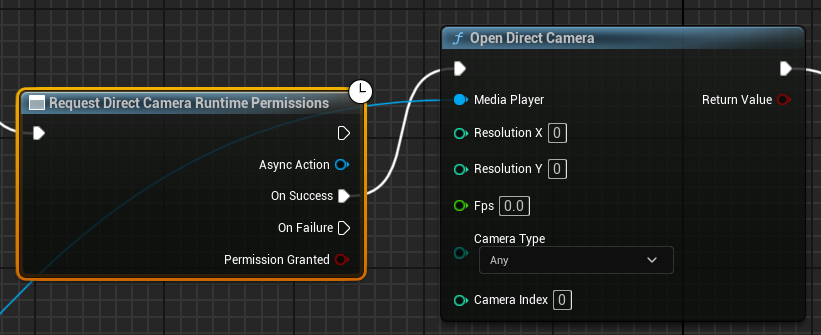
Install and enable the plugin. Once you have the plugin installed, you can create a media player and accompanying texture as usual. In a blueprint, you can connect to a camera like in the image below - first check you have the correct permissions to access the camera, using the Request Direct Camera Runtime Permissions object, and then use Open Direct Camera to open a camera on that media player, rendering to any attached textures. If you don’t care about a parameter on the camera, leave it set at zero.
Notes:
-
Requesting permissions shows a pop-up to users, so it may take multiple frames. Be sure to only link the camera on the ‘on success’ action from the
Request Direct Camera Runtime Permissionsnode. -
If you don’t want to use the special nodes (e.g. if you’re building multiple versions of a project some of which won’t have the plugin), you can just open a
directcamera://url on the media player (and use the standard Android Permission request nodes). See the source code for details of how to construct the URLs (or set the values you want in theOpen Direct Cameranode and copy the URL it sets).
Capture to file (or memory buffer)
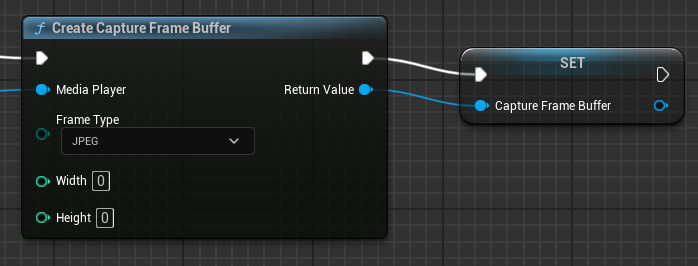
To capture a file, first create a capture buffer like the image below. If you set the resolution to zero on either axis it will use the same resolution as the camera was opened with.
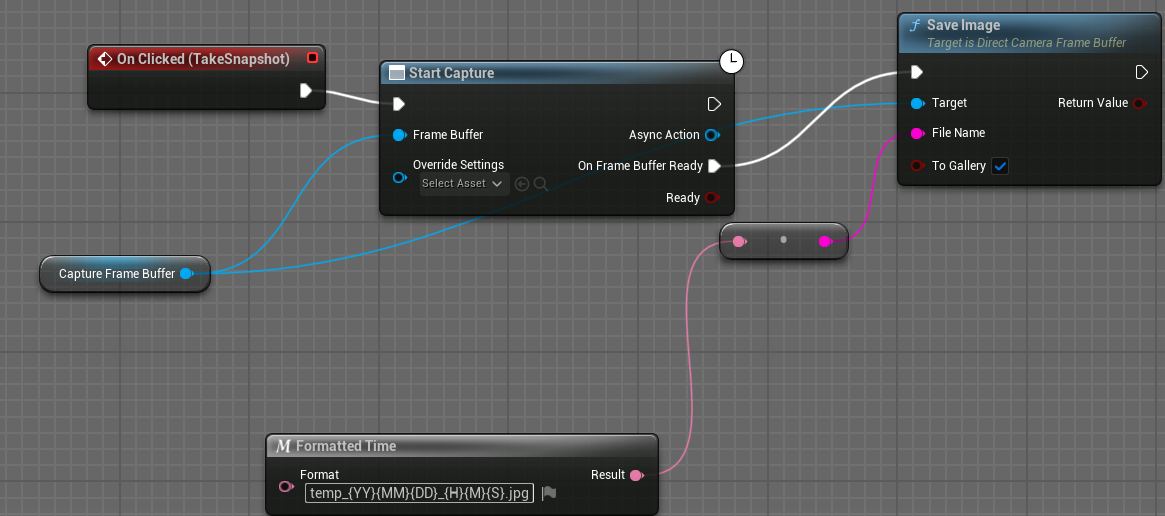
Once you have the capture buffer, you can call Start Capture on it to fill the buffer with a frame from the camera. Once the On Frame Buffer Ready event is fired, you can then read the data from the frame buffer, either as one or more TArray objects, or if you have set it to a compressed format, you can also save the data to a file (as shown in the blueprint below)
Notes:
-
If you want to capture to memory e.g. for machine learning or other processing, set the capture buffer type to either
YUV420(for a single frame capture) orYUV420 Video(for continuous frame capture). To cancel capturing use theStop Capturemethod. -
If you want to capture with settings that are different to the main video stream, you can add a
Direct Camera Capture Settingsobject to theOverride Settingspin of theStart Capturenode. Otherwise settings will be copied over. This is useful e.g. if you want to take very long exposures but don’t want the preview video stream to pause for multiple seconds between frames.
Adjust Camera Settings
DirectCamera provides two ways to adjust settings:
DirectCamera provides a range of setters and getters which work directly on a Media Player object, for example get / set focus mode. The table below lists all the possible settings and their names:
| Property Name | Type | Description |
|---|---|---|
| WhiteBalance Mode | DirectCameraWhiteBalanceMode | White Balance Mode |
| Focus Mode | DirectCameraFocusMode | Focus Mode |
| Exposure Mode | DirectCameraExposureMode | Exposure Mode |
| Flash Mode | DirectCameraFlashMode | Flash Mode |
| AE Mode | DirectCameraAEMode | Auto Exposure Mode |
| AF Mode | DirectCameraAFMode | Auto Focus Mode |
| Stabilization Mode | DirectCameraStabilizationMode | Stabilization Mode |
| Zoom | float | Zoom level (1.0 = no zoom, higher values = more zoom) |
| AE Center | FVector2D | Auto Exposure region center coordinate (0.0 to 1.0, normalized) |
| AF Center | FVector2D | Auto Focus region center coordinate (0.0 to 1.0, normalized) |
| AE Lock | bool | Lock Auto Exposure |
| AF Lock | bool | Lock Auto Focus |
| WhiteBalance Lock | bool | Lock White Balance |
| ISO | int32 | ISO Value |
| FixedExposureTime | float | Fixed Exposure Time (in seconds) |
| FixedFocusDistance | float | Fixed Focus Distance (in diopters) |
| ReadOnly MinFocusDistance | float | Read Only Minimum Focus Distance (in diopters) |
| ReadOnly MinExposureTime | float | Read Only Minimum Exposure Time (in seconds) |
| ReadOnly MaxExposureTime | float | Read Only Maximum Exposure Time (in seconds) |
You can also use a Direct Camera Capture Settings object, which allows you to load and save all camera settings (and to set multiple settings in one go). This has the same list of properties as above. To do this, you use the Get Camera Capture Settings from Media Player node, save the resulting structure object to a variable, edit the settings in that variable and apply them back to the camera using the Set Camera Capture Settings on Media Player node.
Notes:
- Focus distance is in diopters. These are equal to 1/meters. This is because all focusable cameras have a furthest focus at ‘infinity’ which is easier to represent as 0 diopters than having to use extremely large numbers or special values etc. As such the minimum focus distance for a camera is reported as the maximum value in diopters that can be set for focus distance, and the parameter will accept values from 0 to minimum focus distance diopters. If you want to work in meters, there are
Convert Diopters To MetersandConvert Meters to Dioptersnodes included, just bear in mind that a) when converting to meters, infinity will be returned as 999999999999.0, and when converting to diopters, 0 metres is not a possible focus distance and will set the focus to infinity.
Demo APK log dump
If you find the demo apks don’t work on your device, follow the instructions at (https://github.com/joemarshall/DirectCameraExamples/) to send me a logfile dump and I’ll try and fix it.
Logging
If something doesn’t work, and you want to look at logs (or send me some log output), there are two levels of logs available - Verbose and VeryVerbose. To enable these, add a section to DefaultEngine.ini (or add a value into Core.Log if you already set logging levels for anything else), like below.
[Core.Log]
LogDirectCamera=VeryVerbose
Then it will print tons of stuff (or a bit of stuff if you set it to Verbose) to the Android LogCat. You can read a logcat file from command prompt / terminal like so:
-
Clear the logs, so that you don’t log a million lines of data about whatever has happened before:
adb logcat -c - Now start your app. Once it is running, save the logcat output to a file:
adb logcat > output.txt - When your app has finished, output.txt should be full of lovely logs and you can press CTRL+C to stop writing logcat.
Frequently Answered Questions
What do I need to do about permissions
To use camera on Android you need permissions to be set both in Android Manifest, and also to be requested at runtim. If you go to Project Settings / Plugins / Direct Camera you will find two options relating to Android manifest permissions (either for standard camera or for Quest 3) - if you check these options then the correct permissions will be added automatically to the manifest.
At runtime, you need to use the Direct Camera Permission Getter object before any camera access.
How many cameras can I access at once?
This depends somewhat on the hardware. All phones I’ve tested and Quest 3 will allow front and back or left and right cameras to be streamed at once.
Why is this plugin needed?
Unreal has limited support for camera input, and uses an old API. This means:
1) It is hard or impossible to use multiple cameras at once. 2) Unreal uses software buffer formats for video, which is less efficient. 3) Unreal doesn’t support control of camera parameters or manual modes. 4) Unreal doesn’t support jpeg or raw DNG encoding / saving.